SAML: Integrate with Active Directory Federation Services
Related Video:
- Server Host: Microsoft Windows Server 2012 and above with Microsoft Active Directory Federation (ADFS) installed.
- Example of Active Directory (AD) domain: DOMAIN.NAME. Note: The ADFS Server must support TLS 1.2.
- DNS Setup: A Windows host name that must be accessible from the public internet.
- Example of host name: fs.domain.name.
- KACE Cloud subscription: Active KACE Cloud subscription.
- Example of tenant: companyA. Example of portal: https://companyA.kacecloud.com.
KACE Cloud subscribers can use Active Directory Federation Services (ADFS) when setting up single sign-on (SSO) in Windows environments. ADFS allows identity information sharing outside of a company’s network, while adding an additional layer of security beyond a third party active directory.
- Open both KACE Cloud and your ADFS Windows Server.
- In KACE Cloud, complete the following steps:
- Select the Settings tab in top navigation.
- In left navigation, under Integrations, choose Single Sign-On (SSO) .
- Select SAML v2.0.

- In KACE Cloud, import the configuration URL from your identity provider.
-
Construct a new URL to the location of the Federation Metadata XML document on your ADFS server.
For example, for ADFS 3.0, the URL uses the following syntax:
https://<adfs-server-address>/FederationMetadata/2007-06/FederationMetadata.xml
Where adfs-server-address is is the DNS of your ADFS server.
- Copy and paste the newly created URL into the Import from URL section.
- Verify that the newly create URL is valid by pasting it into your browser’s address bar.
If the URL is valid, the FederationMetadata.xml document is automatically downloaded. If this does not happen, update the settings within your ADFS server.
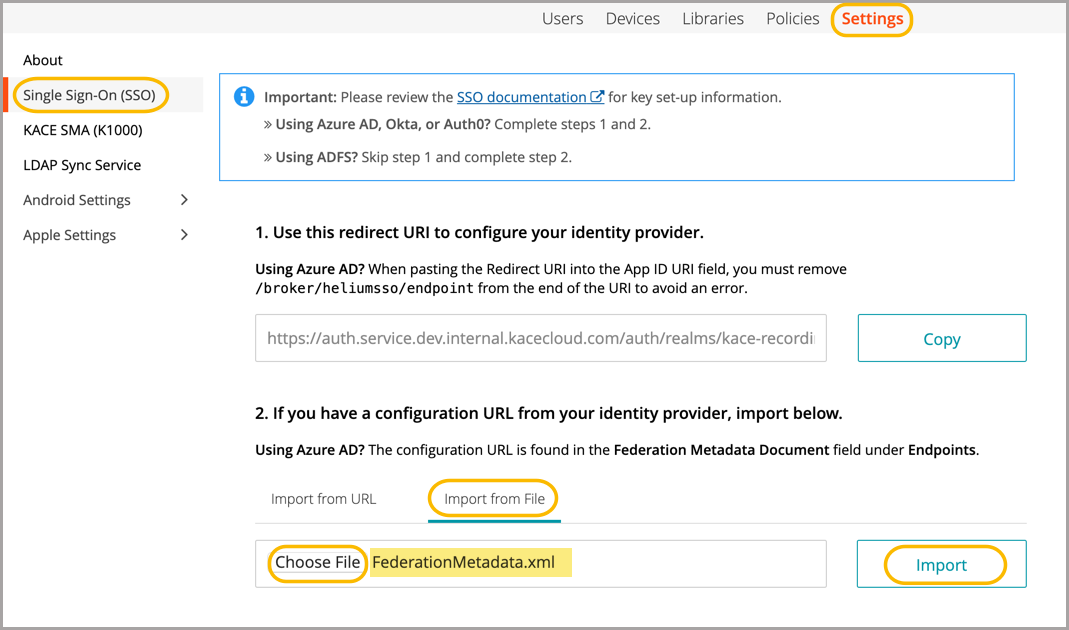
- Click Import.
When imported, the majority of information will be populated in the main SSO configuration form in KACE Cloud.
-
Construct a new URL to the location of the Federation Metadata XML document on your ADFS server.
- In KACE Cloud, update the SAML settings.
- In the SAML Settings area, ensure that the Logout URL is the same as Sign-On URL.
If the Logout URL field is not populated, copy it from the Sign-On URL field. The address can also be found in the Federation Metadata XML document.

- Enable the signature options.
The SAML Signature Key Name and Signature Algorithm check boxes appear when you select the Send signed requests check box.
Specify the following values:
- Send Signed Requests: Select this option.
- NameID Policy Format: Type urn:oasis:names:tc:SAML:1.1:nameid-format:WindowsDomainQualifiedName.
- SAML Signature Key Name: Type CERT_SUBJECT.
- Signature Algorithm: Type RSA_SHA256.
-
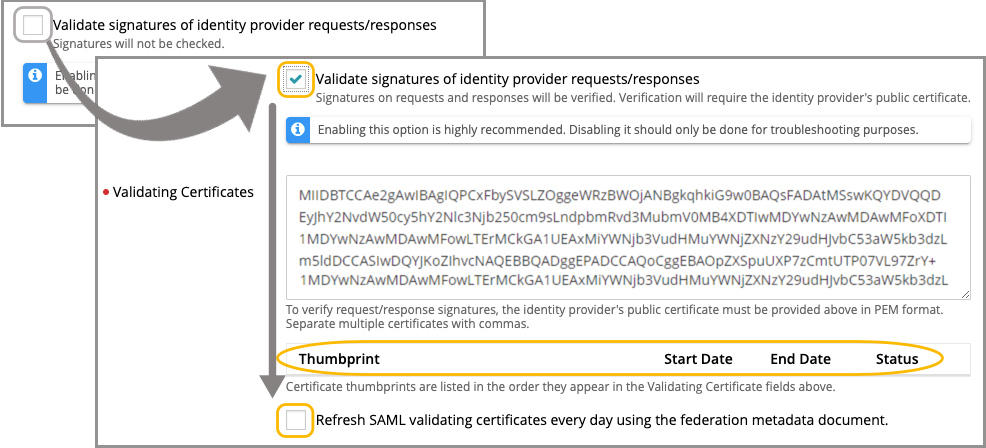
Ensure the Validate signatures of identity provider requests/responses check box is selected, then review the contents of the Validating Certificates field.
It is highly recommended to leave the Validate signatures of identity provider requests/responses check box selected to ensure optimal security. Disable this check box only for troubleshooting purposes.
If the certificate value is included in the FederationMetadata.xml file constructed in step 3, it appears in the Validating Certificates field. Otherwise, copy and paste the appropriate value.
- Click Save Settings at the bottom of the page.
- In the SAML Settings area, ensure that the Logout URL is the same as Sign-On URL.
- In KACE Cloud, review and confirm the user attribute mappings, as needed.
- In the User Attribute Mappings area, type the following values to transform SAML-ADFS attributes to KACE Cloud attributes:
- Attribute > Email: http://schemas.xmlsoap.org/ws/2005/05/identity/claims/emailaddress
- Attribute > First Name: http://schemas.xmlsoap.org/ws/2005/05/identity/claims/givenname
- Attribute > Last Name: http://schemas.xmlsoap.org/ws/2005/05/identity/claims/surname
.png)
When setting up claim rules in ADFS (Rule 2 under Edit Claim Issuance), the attribute SAM-Account-Name is one of four minimum requirements even though it is not represented in KACE Cloud attribute choices.
- Click Save Settings at the bottom of the page.
- In the User Attribute Mappings area, type the following values to transform SAML-ADFS attributes to KACE Cloud attributes:
- In KACE Cloud, assign user roles.
- In the Assign User Roles area, under Device User Role, select Automatic: Assign all SSO users the Device User role if you want to assign the Device User role to all users.

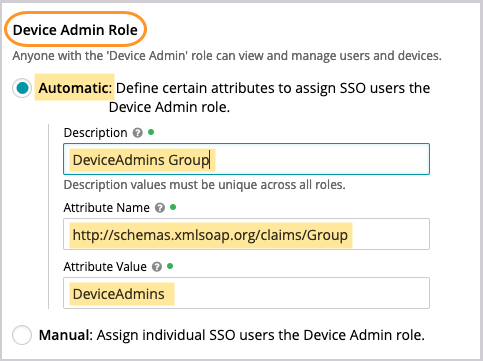
- In the Assign Admin Roles area, under Device Admin Role, if you select Automatic: Define certain attributes to assign SSO users the Device Admin role, configure the following values:
- Description: Specify a unique description for this group mapping.
- Attribute Name: Type http://schemas.xmlsoap.org/claims/Group.
- Attribute Value: Specify an attribute value from the http://schemas.xmlsoap.org/claims/Group node in the SAML document that corresponds to the group you will map later on.
- Click Save Settings at the bottom of the page.
- In the Assign User Roles area, under Device User Role, select Automatic: Assign all SSO users the Device User role if you want to assign the Device User role to all users.
- In KACE Cloud, obtain the SAML service provider's descriptor URI.
The SAML service provider descriptor URI is the Redirect URL value found at the top of the page.
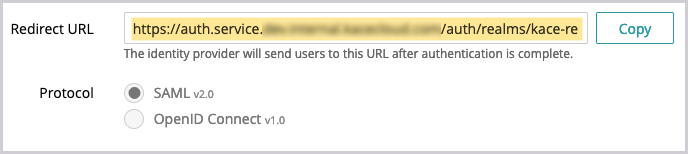
- Click Copy to the right of the Redirect URL field.
When asked to Select Data Source in the ADFS Wizard (in step 8c), append the copied URL it with /descriptor. For example: https://auth.service.kacecloud.com/auth/realms/kace-cloud/broker/heliumsso/endpoint/descriptor
- Click Save Settings at the bottom of the page.
- Click Copy to the right of the Redirect URL field.
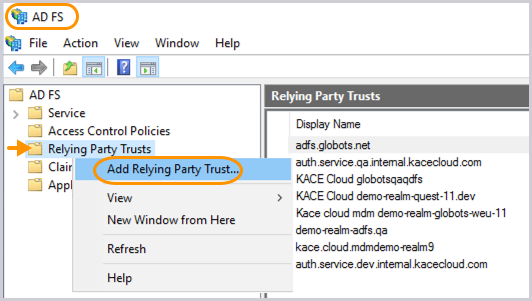
- In ADFS, create and configure a Relying Party Trust.
- In the ADFS management console, righ-click the Relying Party Trusts folder and choose Add Relying Party Trust from the menu that appears.
- In the Add Relying Party Trust Wizard that appears, on the Welcome page, select Claims aware, then click Start.

- On the Select Data Source page that appears, select the first Import data option and type the redirect URL obtained in step 7a into the Federation metadata address field. For example: https://auth.service.kacecloud.com/auth/realms/kace-cloud/broker/heliumsso/endpoint/descriptor
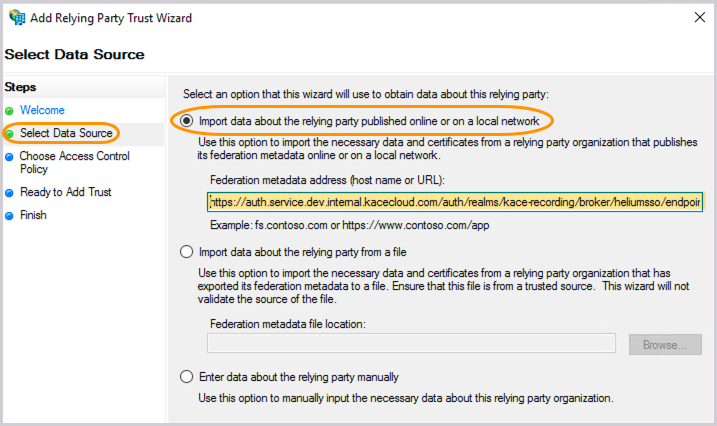
This serves as the SAML descriptor, allowing ADFS to import settings.
Then, click Next.
- On the Specify Display Name page that appears, enter your Display Name.
Your Display Name needs to be unique within ADFS. For example, this can be your tenant name: mytenant.kacecloud.com.
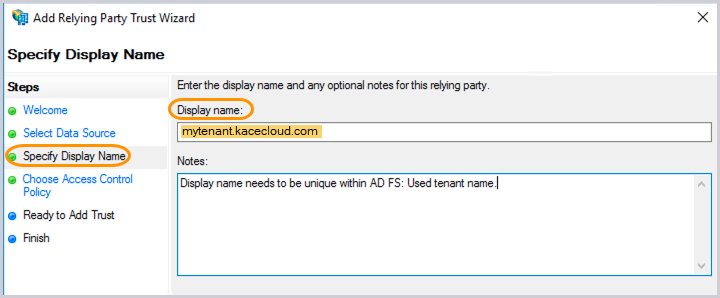
Then, add any notes, as applicable and click Next.
- On the Choose Access Control Policy page that appears, accept the default values or make any changes, as applicable.
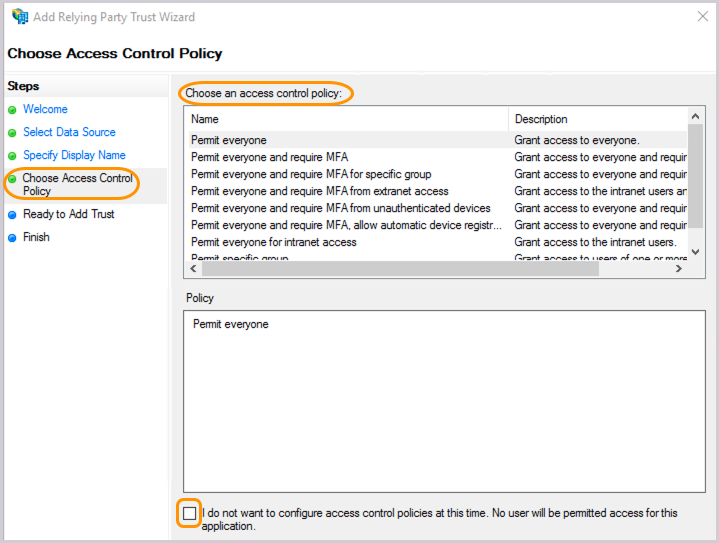
Then, click Next.
- On the Ready to Add Trust page that appears, review the settings across the available tabs.
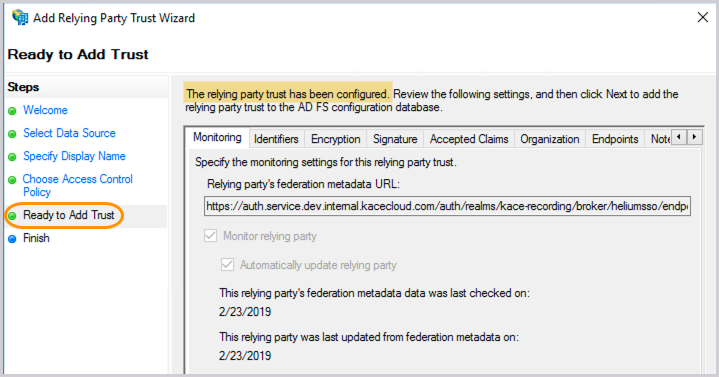
The relying party trust has been successfully configured.
Then, click Next.
- On the Finish page that appears, leave the check box selected so that you can move on to edit Claim Rules.
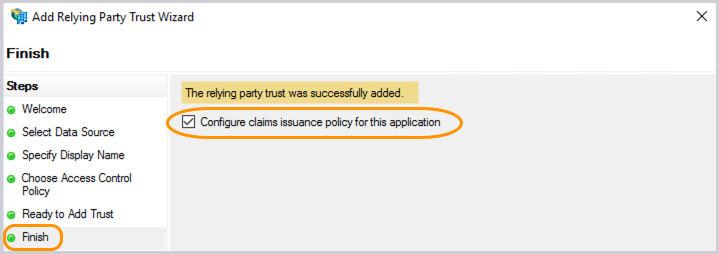
Click Next, then Close to finish the wizard.
- In the ADFS management console, righ-click the Relying Party Trusts folder and choose Add Relying Party Trust from the menu that appears.
- In ADFS, edit Claim Issuance by adding rules.
- In the list of Relying Party Trusts that appears, right-click your newly created party trust, and select Edit Claim Issuance Policy from the menu that appears.
.png)
- Create claim rules, as needed.
- To map each claim rule In the dialog box that appears, click Add Rule. Then, in the Claim rule template box, select Transform an Incoming Claim, and click Next.
.png)
- When you finish configuring each rule, click Finish, then click OK.
- To better understand how this configuration works, let's map three commonly-used rules:
- User ID rule
- Claim rule name: Name ID
- Incoming claim type: Windows Account Name
- Outgoing claim type: Name ID
- Outgoing Name ID format: Windows Qualified Domain Name
- Pass through all claim values: Select this option.

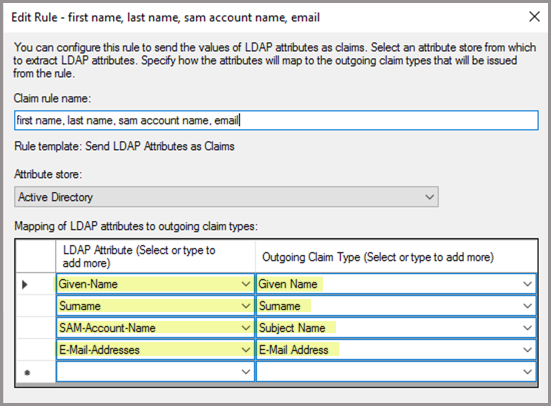
- User Attributes rule
- Claim rule name: First-Last-SAM-Email
- Attribute store: Active Directory
At a minimum, add the following four LDAP attributes to the outgoing claim type mappings. Other attributes can be added, as needed.
LDAP Attribute Outgoing Claim Type Given-Name Given Name Surname Surname SAM-Account-Name Subject Name E-Mail-Addresses E-Mail Address 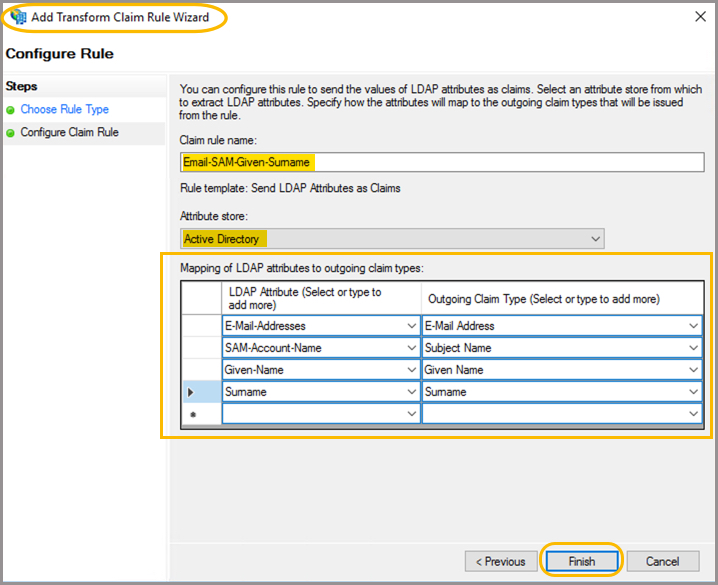
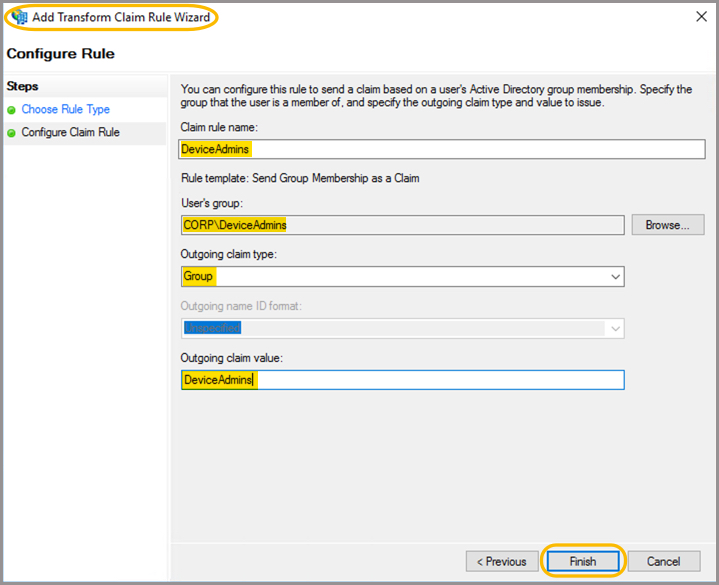
- User Group rule
This rule sensd a group name if the user is a member of a named group. For KACE Cloud, this allows the administrator to automatically assign users to either the Device User or Device Admin roles if they belong to the specified group.
- Claim rule name: DeviceAdmins Group
- User’s Group: CORP\DeviceAdmins
- Outgoing claim type: Group
- Outgoing claim value: The name of the group. For example: DeviceAdmins.
The value will be sent to KACE Cloud for users belonging to this group.
- User ID rule
- To map each claim rule In the dialog box that appears, click Add Rule. Then, in the Claim rule template box, select Transform an Incoming Claim, and click Next.
- In the list of Relying Party Trusts that appears, right-click your newly created party trust, and select Edit Claim Issuance Policy from the menu that appears.
- In KACE Cloud, enable and test single sign-on.
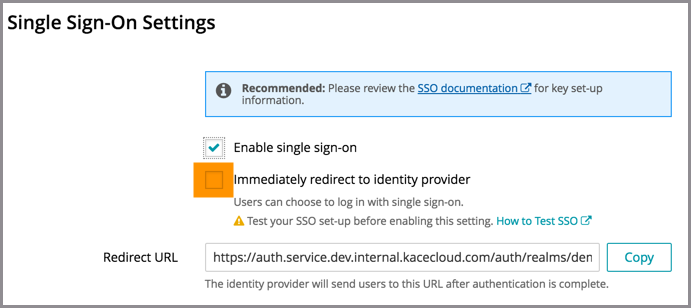
- Under Single Sign-On Settings, at the very top, select the Enable single sign-on (SSO) check box.
- Before selecting the Immediately redirect to identity provider check box, test the success of the single sign-on setup.
- Open a new incognito window or private browser to ensure login data is clear.
- Go to the KACE Cloud portal, but do not log in.
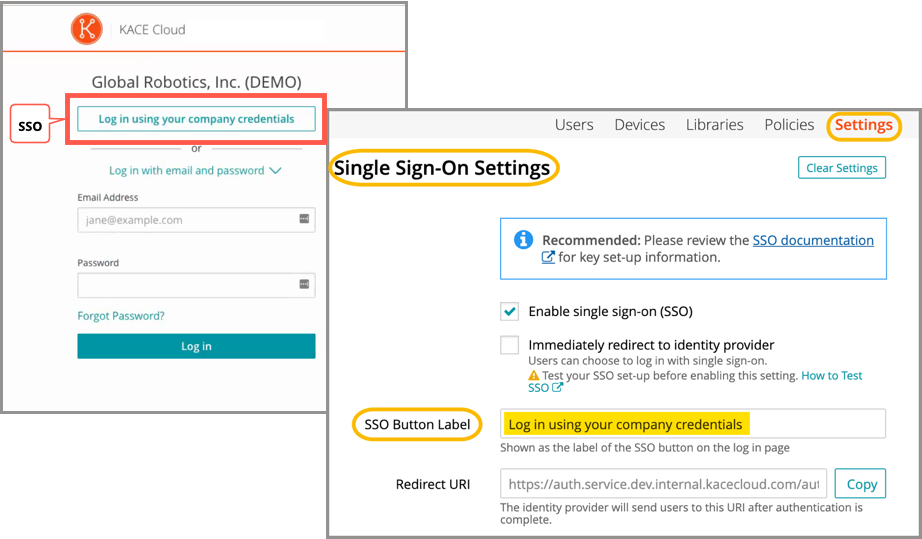
- Follow the Single Sign-On workflow using the customizable button.
In the example below, the Log in using your company credential button leads to the SSO workflow. The label on this button can be customized using the SSO Button Label field at the top of the SSO Wizard.
- On the KACE Cloud Microsoft login page that appears, log in using your identity provider credentials.
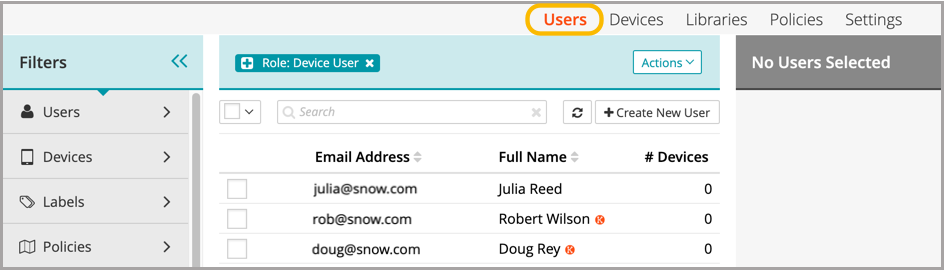
Single sign-on is successfully set up if the Users landing page appears in KACE Cloud:
When the setup of single sign-on is successfully tested, users can be redirected to the identity provider's login screen.
Troubleshooting
| Problem | Solution | ||
|---|---|---|---|
| Single Sign-On button not visible on KACE Cloud portal. | Confirm that Enable single sign-on is checked on the SSO Settings page. | ||
| Error message on KACE Cloud portal. |
Azure AD successfully validated the user name and password, but KACE Cloud did not accept the user. This may be because the user is not in the Azure AD group being assigned a device admin role. To troubleshoot:
|
||
| Single Sign-On misconfiguration or identity provider error | |||
| "invalidFederatedIdentityActionMessage" error message is displayed on KACE Cloud portal. | |||
| During configuration of an ADFS server, upon entering the Federation metadata address (host name or URL) field while configuring the Relying Party Trust on the ADFS server, the following message error is displayed on the ADFS server: An error occurred during an attempt to read the federation metadata. Verify that the specified URL or host name is a valid federation metadata endpoint. | This is due to the ADFS server not being able to successfully access the information that should be contained in the XML document specified by the URL. A likely cause is that the text "/descriptor" was not added to the end of the "Redirect URL" copied from the KACE Cloud Single Sign-On configuration page. | ||
| The ADFS login page displays the message "An error occurred. Contact your administrator for more information." | This can be caused by many configuration issues with the ADFS server, but a likely cause is that after configuring Single Sign-On in KACE Cloud, the ADFS server was not successfully configured as a single sign-on provider for KACE Cloud. Please review how the KACE Cloud settings are configured on the ADFS server. | ||
| After a user successfully logs in on the ADFS login page, they are returned to the original KACE Cloud login page, prompting them to login, instead of the KACE Cloud portal. | In the ADFS configuration, either the "Transform an Incoming Claim" rule for the "Windows Account Name" is missing or not configured correctly. Please review how the KACE Cloud settings are configured on the ADFS server. | ||
| After successfully logging in on the ADFS login page, they are returned to either a blank page, or they receive a message that they are not an authorized user. | The mapping for email address (either on the KACE Cloud side, or the ADFS side) is either missing or incorrectly configured. OR The user was not granted the desired KACE Cloud role needed for the portal they are logging in to. This might also be due to a missing or incorrectly configured Role to Group mapping. Please review how the KACE Cloud settings are configured on the ADFS server. |